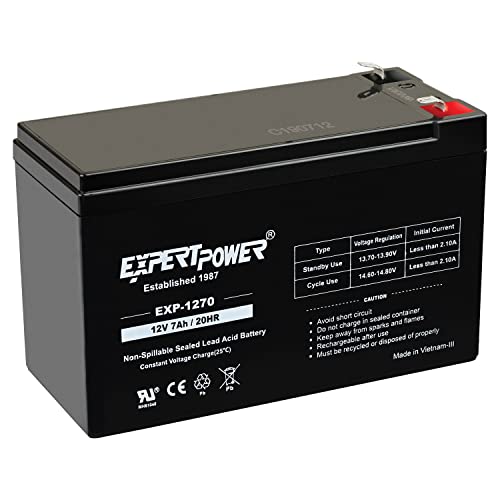
Replacement 12V Battery for Ride On Car: The Complete Guide
Everything you need to know about choosing, installing, and maintaining a new 12V battery for your child's ride on car — so the fun never has to stop.
Expert guidance for a safe, reliable power upgrade.
🔋 Is your child's ride on car losing its get-up-and-go? A sluggish motor, shorter run times, or a vehicle that simply won't move are classic signs that the 12V battery has reached the end of its useful life. Before you consider retiring the ride on car entirely, a simple battery replacement can restore full performance and extend the life of the toy for years.
This guide walks you through everything you need to know about a replacement 12V battery for a ride on car — from understanding the key specifications and compatibility factors to installation tips and long-term care. Whether you own a ride-on car with parental remote control or a simpler ride-on toy, this resource will help you make a confident, informed decision.
Why Replace the Battery Instead of the Whole Ride On Car?
Ride on cars are a significant investment in your child's outdoor play and development. When the battery fails, the vehicle itself — the frame, wheels, motor, and safety features — is often still in excellent condition. Replacing just the battery is a far more sensible and sustainable choice than discarding the entire toy.
Beyond the practical benefits, a replacement battery offers several advantages:
- Extended play life: A fresh battery restores full run time and motor performance, giving the ride on car a second life.
- Environmental responsibility: Keeping the existing vehicle out of landfill and recycling the old battery reduces waste.
- Cost efficiency over time: A battery replacement is a long-term investment that keeps the toy functional for years.
- Safety assurance: A new battery eliminates the risks associated with an aging, potentially unreliable power source.
If your child has outgrown the vehicle's power or you're considering a more capable model for older kids, you might explore options like ride-on cars for 8-year-olds or even 24V ride-on toys for 10-year-olds. But for many families, a simple 12V battery swap is all that's needed.
Key Specifications of a Replacement 12V Ride On Car Battery
Not all 12V batteries are created equal. Understanding the core specifications ensures you select a battery that is compatible, safe, and capable of delivering the performance your child expects.
1. Voltage (12V)
The voltage must match the original battery exactly — in this case, 12 volts. Using a battery with a different voltage can damage the motor, control board, or charging system. Never attempt to use a 6V or 24V battery in a 12V vehicle.
2. Capacity (Ah — Amp-hours)
Capacity determines how long the ride on car can run on a single charge. Common capacities for 12V ride on car batteries range from 4.5Ah to 12Ah. A higher Ah rating means longer run time, but it also means a physically larger and heavier battery.
- Entry-level (4.5Ah–7Ah): Suitable for shorter play sessions and lighter vehicles.
- Mid-range (7Ah–9Ah): A balanced choice for most standard ride on cars, offering a good run time for typical use.
- Premium (10Ah–12Ah): Ideal for heavier vehicles, two-seater models, or families who want extended play sessions.
When upgrading capacity, always verify that the battery physically fits in the compartment and that the charger is compatible with the new battery's capacity.
3. Battery Chemistry
Most ride on car batteries are sealed lead-acid (SLA) or absorbed glass mat (AGM) types. These are maintenance-free, spill-proof, and designed for deep-cycle use. Some newer models may use lithium-ion batteries, which are lighter and offer better energy density — but they require a compatible charger and may have different safety considerations.
4. Terminal Type and Orientation
Battery terminals come in different sizes and configurations (e.g., F1, F2, or bolt-through). Check your original battery's terminal type and orientation to ensure the replacement connects properly. Using the wrong terminal type can lead to a loose connection or difficulty installing.
5. Physical Dimensions
Measure the original battery's length, width, and height. The replacement must fit within the battery compartment — there's usually little room for variation. Also, note the position of the terminals (top, side, or front) to ensure the wiring reaches without strain.
| Specification | What to Check | Why It Matters |
|---|---|---|
| Voltage | Must be exactly 12V | Prevents damage to motor and electronics |
| Capacity (Ah) | Match or slightly exceed original | Determines run time per charge |
| Chemistry | SLA, AGM, or Li-ion (match charger) | Ensures safe charging and longevity |
| Terminal Type | F1, F2, or bolt-through | Guarantees secure electrical connection |
| Dimensions | Length × Width × Height | Fits within the battery compartment |
How to Ensure Compatibility with Your Ride On Car
Compatibility is the single most important factor in a successful battery replacement. Here's a step-by-step approach to getting it right:
- Identify your ride on car model: Check the user manual or the label on the vehicle itself. Knowing the brand and model helps you find the exact replacement or a verified compatible alternative.
- Inspect the original battery: Remove the old battery (if possible) and note its specifications — voltage, capacity, terminal type, and dimensions. A photo of the label can be very helpful.
- Check the charger: Ensure your existing charger is compatible with the replacement battery's chemistry and capacity. Using a mismatched charger can reduce battery life or create safety risks.
- Verify the connector: Some ride on cars use a specific connector (e.g., a three-pin plug or a fuse-protected harness). The replacement battery should either include the same connector or allow you to transfer the old connector.
- Consult the manufacturer or a specialist: If you're unsure, contact the ride on car manufacturer or a reputable battery retailer for guidance. Many online battery stores also provide compatibility charts.
💡 Pro Tip: If your ride on car is a popular model, you may find that the manufacturer offers a direct replacement battery. These are guaranteed to be compatible, though aftermarket options often provide equivalent or better performance at a more competitive position in the market.
Types of Replacement 12V Batteries: A Tiered Overview
Replacement batteries for ride on cars fall into several broad categories based on their construction, capacity, and intended use. To help you navigate the options, here's a tier-based classification that focuses on quality and performance rather than transient market factors.
| Tier | Typical Capacity | Best For | Key Characteristics |
|---|---|---|---|
| Entry-Level | 4.5Ah – 6Ah | Lightweight, single-seat ride on cars used for short play sessions | Standard SLA construction; adequate for basic use; shorter run time |
| Mid-Range | 7Ah – 9Ah | Most standard ride on cars; families wanting a balance of run time and size | AGM or enhanced SLA; better cycle life; good value for its tier |
| Premium | 10Ah – 12Ah | Two-seater vehicles, heavier models, or extended outdoor play | High-grade construction; deeper discharge capability; durable |
| Top-Tier | 12Ah+ or lithium-ion | Enthusiast use, frequent riding, or performance-focused upgrades | Advanced chemistry (Li-ion or premium AGM); lightweight; long cycle life; feature-rich for its class |
When choosing a tier, consider how often the ride on car is used, the weight of the rider, and the terrain. For example, a ride-on toy for 6-8 year olds used daily on a driveway may benefit from a mid-range or premium battery, while a lightweight model used occasionally can perform perfectly well with an entry-level option.
Step-by-Step Battery Replacement Installation
Replacing the battery is a straightforward DIY task that most parents can complete in under 30 minutes. Here's a safe, step-by-step process:
What You'll Need
- New 12V replacement battery
- Screwdriver (Phillips or flathead, depending on the battery compartment)
- Camera or smartphone (to photograph wiring before disassembly)
- Clean cloth or paper towels
- Safety glasses (optional but recommended)
Step 1: Power Down and Disconnect
Turn off the ride on car and ensure the charger is unplugged. Locate the battery compartment (usually under the seat or hood). Disconnect the black (negative) terminal first, then the red (positive) terminal. This order reduces the risk of accidental short circuits.
Step 2: Document the Wiring
Before removing anything, take a clear photo of the wiring layout. Note which wire connects to which terminal and how the battery is secured. This will be invaluable when installing the new battery.
Step 3: Remove the Old Battery
Loosen the bracket or strap securing the battery, then carefully lift it out. If the battery is heavy or stuck, use a gentle rocking motion. Avoid pulling on the wires.
Step 4: Clean the Compartment
Wipe down the battery compartment to remove dust, debris, or any corrosion. A clean compartment ensures better heat dissipation and a tidy installation.
Step 5: Install the New Battery
Place the new battery in the compartment, oriented the same way as the original. Connect the red (positive) terminal first, then the black (negative) terminal. Tighten the connections securely but avoid over-tightening, which can damage the terminals.
Step 6: Secure and Test
Reattach the battery bracket or strap. Replace the compartment cover and seat. Turn on the ride on car and test forward, reverse, and speed functions. If everything works as expected, you're done!
⚠️ Safety Warning: Always disconnect the negative terminal first and reconnect it last. Never allow tools to bridge both terminals simultaneously, as this can cause a short circuit or spark. Keep batteries away from children during installation.
If you're not comfortable performing the installation yourself, many hobby shops and small appliance repair services can do it for you. For those with more complex vehicles, such as a ride-on car 2-seater with remote, it's worth checking whether the manufacturer provides specific replacement guidelines.
Maximizing Battery Life: Maintenance and Care Tips
A replacement battery is an investment — and with proper care, it can last significantly longer. Follow these best practices to get the most from your new 12V battery:
- Charge after every use: Avoid letting the battery sit in a discharged state. Recharge it fully after each play session, even if the ride on car was only used briefly.
- Store in a cool, dry place: Extreme heat and cold degrade battery performance. If the ride on car is stored outdoors, bring the battery inside during temperature extremes.
- Avoid deep discharges: Recharge before the battery is completely drained. Deep discharges shorten the lifespan of lead-acid batteries.
- Use the correct charger: Always use the charger that came with the ride on car or a compatible replacement. Fast chargers or mismatched chargers can damage the battery.
- Periodic maintenance charges: If the ride on car is not used for extended periods (e.g., winter), give the battery a top-up charge every 4-6 weeks.
- Inspect terminals: Check for corrosion or loose connections periodically. Clean terminals with a baking soda solution if needed.
💡 Long-Term Tip: Rotate between two batteries if your family uses the ride on car frequently. This allows each battery to cool down between uses and can extend the overall lifespan of both.
Common Mistakes to Avoid
Even experienced parents can make mistakes when replacing a ride on car battery. Here are the most common pitfalls and how to avoid them:
- Ignoring the charger compatibility: A charger designed for a 7Ah battery may not properly charge a 12Ah battery. Always match the charger to the battery's capacity.
- Buying based on size alone: A battery that fits physically may still have the wrong voltage or terminal type. Always verify all specifications.
- Reversing polarity: Connecting the positive and negative terminals incorrectly can permanently damage the ride on car's electronics. Double-check the wiring diagram.
- Skipping the break-in period: New batteries benefit from a few gentle charge-discharge cycles before full use. Avoid running the ride on car until completely drained during the first few uses.
- Discarding the old battery improperly: Lead-acid batteries are hazardous waste. Take them to a certified recycling center.
By avoiding these mistakes, you'll ensure a smooth replacement process and reliable performance from your new battery.
Ready to Restore the Fun?
Explore our curated selection of compatible replacement batteries and find the perfect match for your ride on car. Our expert picks are tested for performance, safety, and durability — so you can ride with confidence.
Frequently Asked Questions
Final Thoughts
A replacement 12V battery for a ride on car is one of the most practical and cost-effective ways to extend the life of your child's favorite toy. By understanding the key specifications, ensuring compatibility, and following proper installation and maintenance practices, you can restore full performance and keep the adventures rolling for years to come.
Whether your child is cruising in a ride-on toy car with remote control or exploring the neighborhood in a ride-on car for 7-year-olds, a fresh battery ensures every journey is powered by reliable, safe energy. Explore our recommended options above and give your ride on car the boost it deserves.